Create custom accordion vertical menu with jquery in easy way

Here i am going to provide you very common script that you have used so much time.Here i have provided very easy way to create this script or you may apply this script in your project directly.
I this script, i haven't used any bootstrap or other framework, i just used simple html, css and jquery.

I have assumed that you have basic knowledge of  html, css and jquery. If you don't know about jquery then go to link and read jquery.ohhh...one thing more..i have used font awesome for this script.

Learn Jquery

1.  Create html part for this accordion script.


2. Now create css for this script.
@font-face{
 src:url(fonts/open-sans/OpenSans-Regular_0.ttf);
 font-family: openR;
}

body{
 font-family: openR;
}

.mainContainer{
 width: 1000px;
 margin: 0 auto;
}

.mainMenu{
 margin-bottom: 10px;
}

.mainMenu h3{
 margin: 0px;
 padding: 0px;
}

.mainMenu{
 background: #eee;
 border:1px solid #ccc;
 border-radius:3px;
 padding: 3px 5px 5px 3px;
}

.mainMenu i{
 font-size: 20px;
 cursor: pointer;
 display: block;
}

.mainMenu ul{
 margin: 0px;
 padding: 0px;
 margin-top: 20px;
 border-radius:4px;
 list-style: none;
}

.mainMenu ul li{
 padding: 5px 8px;
 display: block;
 background: #fff;
 border-top:1px solid #ccc;
 border-left:1px solid #ccc;
 border-right:1px solid #ccc;
}

.mainMenu ul li:last-child{
 border-bottom:1px solid #ccc;
}

3. Now create main important file for js and paste the code below.

// When window load
$(window).load(function(){
 $(".mainMenu ul").hide();
 $(".mainMenu i").addClass("fa-plus");
});

// When Page loaded
$(document).ready(function(){
 $(".mainMenu").on("click","i",function(){
  $targetDiv=$(this).attr("data-target");
  $(this).toggleClass("fa-minus");
  // console.log($targetDiv);
  $("ul."+$targetDiv).slideToggle("slow");
 });
}); 

Create effortless Dynamic Events Show in Calendar


This is very natural and clear-cut script. This is thoroughly dynamic script. I have created sensible and dynamic Calendar events with html, bootstrap, custome css and jquery. I have used the Jquery for Date-picker.In this Script I have used tooltip using with Css.In this Script I have provided the back-end you will add, Update, Delete, View Events.  This Script oftentimes use in the website. I have used bootstrap classes .if you don’t have knowledge of bootstrap. You will click on this link http://getbootstrap.com/css/ and get completely knowledge of bootstrap.

If you are fresher then this code is positive for your website. You also see Some Screenshot. I am given the database with instruction guide. How to import database in the mysql.If you want to study this code. Click this link get source code. You can also apply this script on your projects.
In this script I have created one table “calendar_events”. Which I tested demo content.

Create simple single level drop-down menu with css without jquery

This is very simple tutorial as i mentioned in the heading of this tutorial. In this tutorial i have created very simple drop-down menu with only html and css.I am not using any using any jquery or javascript for this.

If you are beginner and want to create some website from scratch then i think you should use this code for your website. In this tutorial i have used bootstrap classes. If you want to learn bootstrap then follow this link.

Learn Bootstrap from scratch

1. Create HTML code for drop down menu.


  Create single level custom drop-down menu with css


Create Css Code for this
#menuBar{
 background: #666;
 margin-top: 20px;
 border-radius:2px;
}

#menuBar ul{
 margin: 0px;
 padding: 0px;
}

#menuBar ul li{
 display: inline-block;
}

#menuBar ul li a{
 display: block;
 padding: 10px 15px;
 color: #fff;
 text-decoration: none;
 font-size: 18px;
}

#menuBar ul li a:hover{
 background: #333;
}

#menuBar ul li ul{
 position: absolute;
 display: none;
 background: #666;
 border-top:2px solid #000;
}

#menuBar ul li ul li{
 display: block;
}

#menuBar ul li:hover ul{
 display: block;
}

Create pagination with php functions

If you don’t know about pagination and how to create it then here is a tutorial for pagination in php with the help of functions. Pagination is very important if we are creating dynamic sites and there are lots of ways to creating it. Creating pagination is tricky way, Firstly you should know about the structure that how it will work; like how many result you want to show, I have used very simple way so that anybody can understand whether he is beginner or he is very good programmer.

In this I have used bootstrap; If you don’t have knowledge of bootstrap then you can learn bootstrap here. This script is not depends on bootstrap but I have used bootstrap for writing this article in easy way. You can apply this script on your running project but I suggest you to test this script separately so that you can learn very well and then you may apply. So if you want to learn then just follow the following simple steps.

In this article I have created a database “users” and table “users” where I stored the data of many users (Demo Data).

1.    First of all create database “Users”.
2.    Create table “users”.
3.    In this table create 3 field id, name and email.


Now your database is configured.


Create Functionality for pagination

1.    Create “pagination” folder on your localhost (Wamp or Xampp).
2.    Create “index.php” file in this folder and paste the code below.


        Php Pagination with functions


'; // print_r($data); // echo ''; for($d=0;$d
Name Email
3.    Now create a “function.php” and paste the code below.
	// Database connectivity
	mysql_connect("localhost","root","") or die(mysql_error());
	mysql_select_db("users") or die(mysql_error());

	// Creating function for fetching data from database.
	function fetch_data($start,$limit){
		$res=array();
		$countRows=mysql_query("SELECT * FROM users");
		$fetchAllData="SELECT * FROM users LIMIT $start,$limit";
		
		$runQuery=mysql_query($fetchAllData);
		$res['countRows']=mysql_num_rows($countRows);
		while($data=mysql_fetch_array($runQuery)){
			$res['name'][]=	$data['name'];
			$res['email'][]=$data['email'];
		}
		return $res;
	}
4.    I have also create a “style.css” file and the code is below.
#mainContainer{
	margin-top: 30px;
}

#mainContainer ul{
	text-align: center;
}

Learning WordPress theme development from scratch – Part 2

 In the first part of this tutorial you have seen that how to download WordPress and what is the structure for WordPress for theme development. In this tutorial we will see that what is the basic requirement for creating theme and how to configure WordPress in our local system?

Configure WordPress on local server:
  1. Open your browser and run this http://localhost/wordpress.  If you do this you will see the following page on your browser.


Click on let’s go button. Now you will see the following screen.
Fill the fields, I think you are aware from these fields, Let me explain.
Database name:  This is database name where WordPress save your all data
User name:  This is the username of your MySql Database. Default is root.
Password:  This is the password of your MySql Database. Default is empty.
Database host:  This is host name where WordPress running. Default is localhost.
Table Prefix:  When wordpress install it creates many table so you can define here prefix of those table. Default wp_.
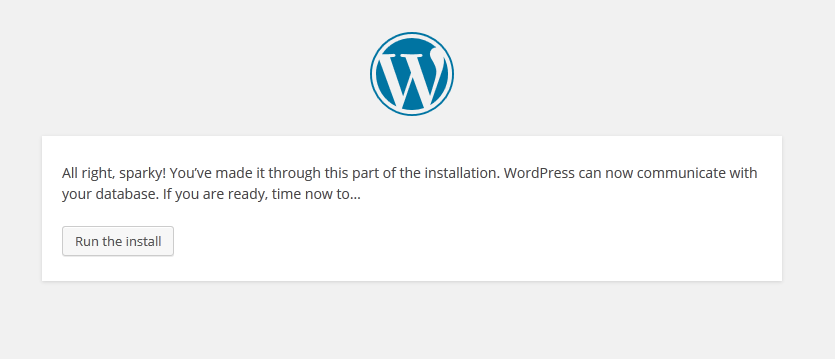
If you do all the process in correct way then you will get the following message.


Here you click “Run and Install”.

Now time to create your blog basic things like title, admin user and admin password. When you run this process you find the following screen where you fill the require fields.


Fill this basic information and install WordPress. Now you will see the following success message.
Awesome! Now you have installed WordPress on your server and time to login to your dashboard with your login username and password that you created on previous step.


Finally you got your final dashboard screen of WordPress.


Now you have knowledge of basic WordPress installation on your server.


Ads

Web Hosting